Description
Product overview: Fluke 830 Laser Shaft Alignment Tool
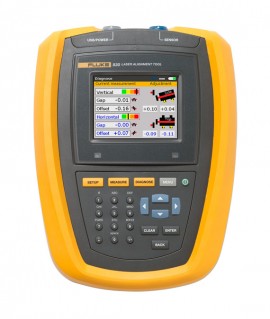
The Fluke 830 Laser Shaft Alignment Tool is the ideal test tool to precision-align rotating shafts in your facility.
It’s a known fact – all rotating machinery is susceptible to misalignment. If you’re still using rulers and dial indicators to ensure your rotating machinery is properly aligned, you could be losing thousands of dollars per year in replacement bearing costs, hours of unnecessary repair time, and crippling unplanned downtime, not to mention taking years off your machine’s useful life.
The Fluke 830 Laser Shaft Alignment tool is easy-to-use, giving you fast, accurate and actionable answers that will keep your plant up and running. When it comes to laser shaft alignment, data is good but answers are better.
Unlike using the straightedge method or dial indicators the Fluke 830 performs the complicated alignment calculations for you, meaning you’ll have the answers you need to quickly align your machine and get your plant up and running fast. An enhanced user interface provides easy to understand results that don’t require extensive alignment knowledge and the unique “All-in-One” result screen that shows you both coupling results and feet corrections (vertical and horizontal) in real terms making it easy to take corrective action.
Since machine downtime is costly, test repeatability is critical. The Fluke 830 uses a patented single laser precision alignment system that provides accurate and repeatable measurement results so you can be assured you’re addressing misalignment problems properly.
Other useful features:
- Includes a unique “All-in-One” result screen that shows both coupling results and vertical and horizontal feet corrections, making it easy to take corrective action
- Features a dynamic machine tolerance check that provides continuous evaluation of alignment adjustments so you know when your machine is in the acceptable range
- Offers unique extend mode to handle gross misalignment by virtually increasing laser detector size
- Provides auto save and resume capability to ensure your data is there when you need it
Feature and benefits:
• Single laser measurement technology means reduced errors from backlash resulting in better data accuracy
• Intuitive guided user interface quickly and easily complete machine alignments
• Compass measurement mode enables flexible, reliable and repeatable measurements using an activated electronic inclinometer
• Dynamic machine tolerance check provides continuous evaluation of alignment adjustments so you know when your machine in acceptable range
• Unique extend mode handles gross misalignment by virtually increasing laser detector size
• Data protection ensures your data is there when you need it with auto save and resume capability
Specifications: Fluke 830 Laser Shaft Alignment Tool
| Computer | |
| CPU | Intel XScale PXA270 running at 312 MHz |
| Memory | 64 MB RAM, 64 MB flash |
| Display | Type: TFT, transmissive (sunlight-readable), 65,535 colors, backlit LED |
| Integrated light sensor for automated adjustment of the brightness to the display according to the lighting conditions which extends battery life | |
| Resolution: 320 x 240 pixel; Dimensions: 89 mm (3.5 in) diagonal |
|
| Keyboard elements: Setup, measure, diagnose, menu, clear, enter, back keys, navigation cursor cross, alphanumeric keyboard and on/off button | |
| LED indicators | Multicolor LED for laser status and alignment condition |
| Multicolor LED for battery status | |
| Power supply | Integrated Lithium-ion polymer rechargeable battery: 7.4 V/ 2.6 Ah (for optional computer) with typical operating time of 17 hours (based upon an operating cycle of 33% measurement, 33% computation and 33% ‘sleep’ mode) |
| External interface | USB host and USB device (slave) |
| Integrated wireless communication, Class 1, transmitting power 100 mW | |
| RS232 (serial) for sensor | |
| AC adapter/charger socket | |
| Environmental protection | IP 65 (dustproof and water spray resistant), shockproof |
| Relative humidity 10% to 90% | |
| Operating temperature | -10°C to 50°C (14°F to 122°F) |
| Storage temperature | -20°C to 60°C (-4°F to 140°F) |
| Dimensions | 220 mm x 165 mm x 45 mm (8.7 in x 6.5 in x 1.8 in) |
| Weight | 742 g (1.64 lb) |
| Sensor | |
| Measurement principle | Coaxial, reflected laser beam |
| Environmental protection | IP 67 (submersible, dustproof) |
| Ambient light protection | Yes |
| Storage temperature | -20°C to 80°C (-4°F to 176°F) |
| Operating temperature | 0°C to 55°C (32°F to 131°F) |
| Dimensions | 107 mm x 70 mm x 49 mm (4 1/4 in x 2 3/4 in x 2 in) |
| Weight | 177 g (6 1/2 oz) |
| Laser | Type: Ga-Al-As semiconductor laser |
| Wavelength (typical) 675 nm (red, visible) | |
| Safety class: Class 2, FDA 21 CFR 1000 and 1040 | |
| Beam power: < 1 mW | |
| Safety precautions: Do not look into laser beam | |
| Detector | Measurement area: unlimited, dynamically extendible (U.S. Patent 6,040,903) |
| Resolution: 1 μm; Accuracy (avg): > 98% | |
| Inclinometer | Measurement range: 0° to 360°; Resolution: < 1° |
| Prism | |
| Type | 90° roof prism; Accuracy (avg): > 99% |
| Environmental protection | IP 67 (submersible, dustproof) |
| Operating temperature | -20°C to 60°C (-4°F to 140°F) |
| Storage temperature | -20°C to 80°C (-4°F to 176°F) |
| Dimensions | 100 mm x 41 mm x 35 mm (4 in x 1 5/8 in x 1 3/8 in) |
| Weight | 65 g (2 1/2 oz.) |
| Carrying case | |
| Dimensions | 565 mm x 343 mm x 127 mm (22 1/4 in x 13 1/2 in x 5 in) |
| Weight, including all standard parts | 5.6 kg (12.3 lb) |


